
What is a Cerused Wood Finish?
Cerusing, also known as liming or pickling, is a wood finishing technique that creates a two-toned look, where the open grain of the wood is accentuated against a contrasting base color.
Origin
Liming wood originated in the sixteenth century in Europe, where a caustic paste of slaked lime (not very healthy stuff) would be rubbed into the open grain of the wood to deter wood-boring insects. This lime washing somehow resulted over the centuries in a decorative look that is popular among modern-day designers and decorators. The effect of this technique is now commonly referred to as "cerusing" or creating a "pickled" look.
Color options
Most of the cerusing you may see is a darker background/base color with a white or off-white color visible in the open grain. However, any color combination may be used, including light base colors with a dark color in the grain.
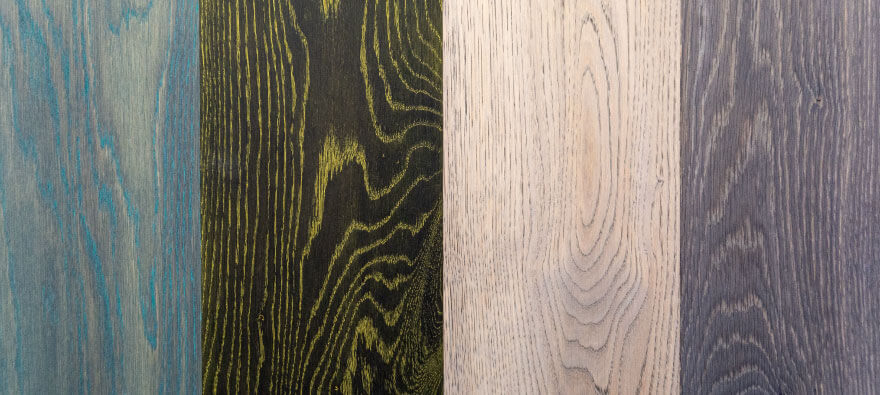
Left to right: PCE "Mystic Brown" & OP2C "Custom Blend", PCE "Intense Black & OP2C "Touch of Gold", PCE "Nordic White" & OP2C "Custom Blend", Fumed & OP2C "White 5%"
Which wood species are best for cerusing?
Cerusing is best accomplished using ring-porous wood species. It is the larger pores of the springwood (aka earlywood) in ring-porous wood species that allows for contrasting colors to be left behind in the deeper pores.
Examples of ring-porous woods are:
- Red Oak
- White Oak
- Ash
- Elm
- Chestnut
Additionally, the sawing method of these wood species also makes a difference.
Plain-sawn planks exhibit the most pleasing and dramatic effect (showing a “flame-like” pattern following with the wood grain), while quarter-sawn wood shows a much cleaner and straight effect.
Note: Diffuse-porous wood species like Maple, Aspen, and Poplar do not exhibit these large open springwood pores like ring-porous wood and are less suitable for producing a cerused effect.
How to ceruse wood using Rubio Monocoat
What you will need:
- Oil Plus 2C in your selected color
- A pre-treatment option you choose in your selected color.
- Raw Wood Cleaner
- Clean mixing container
- Paint can opener
- Stir stick
- Measuring device
- Latex or nitrile gloves
- Safety goggles
- Applicator Set for the application of the oil
- Good quality absorptive rags or terry cloths
- Water filled metal can with lid for disposal of oil-contaminated rags and pads.
- Wire-brush (Optional)
1. Prepare the surface
- Sand the surface smooth. We recommend sanding wood up to 120 grit (150 grit on furniture is acceptable) but don't go finer as that closes off the wood grain making absorption of the finish difficult.
- Optional: Wire-brush the wood to open the grain even further. Make a few passes with the wire-brush along the grain and examine the effect. Each pass will pull a little more out of the soft grain, increasing the contrast of the final look.
- Once wire brushing is complete, you lightly sand again with the same finishing grit as under step 1 to open the wood surface again.
- Vacuum up the dust on the surface.
- Clean the surface using Raw Wood Cleaner and allow to dry completely.
2. Apply the base color
Applying Precolor Easy "Intense Black"
To create the background or base color of the wood, you have a few different product options:
- Fumed - Reacts with tannins int he wood to give an aged grey look (best applied to White Oak).
- Pre-Color Easy - Provides an intense and uniform color.
- Pre-Aging - Gives wood an aged wood with color variation.
Instructions and videos for each product are on their respective product page.
Whichever pre-treatment product is applied, allow the recommended dry time before the application of Oil Plus 2C.
3. Apply the contrasting color
Applying Oil Plus 2C "White" over the Precolor Easy "Intense Black"
The cerused effect is achieved by applying Oil Plus 2C over your base color.
Choose a color that contrasts the base color and apply over the top.
- Oil Plus 2C - Provides color and finish to finalize the cersued look.
Again, instructions and videos for Oil Plus 2C are on the product page.

Removing the excess oil to reveal the cerused look
Important! Rags saturated in oil are combustible and require being disposed of in accordance with local regulations.
Here are some oily rags safety tips from the NFPA.
4. Allow the surface to dry
Allow the surface to dry under favorable drying conditions. This means temperatures at least in the 65-70F range, relative humidity around 50%, and plenty of air movement. Cooler conditions or very high relative humidity will extend the dry and cure time.
Oil Plus 2C may be carefully handled after 24-36 hours and is 80% cured in 48 hours. Full cure is achieved within five days.
Do not expose the oiled surface to moisture until completely cured!
Alternative options
Another simple cerusing method is to first apply Oil Plus 2C in a selected color on the prepared wood substrate. Next apply Universal Maintenance Oil, in a contrasting color, over the dry Oil Plus 2C. This is an alternative cerusing method that provides a higher sheen than the above-outlined process.